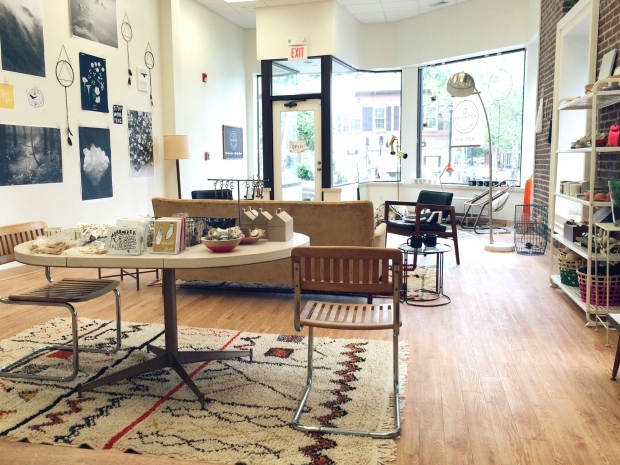
The HausWitch has landed.
HausWitch Home + Healing has been open for 3 whole weeks now (!) so I thought I would share a bit about the process of making the space mine. A very wise woman told me to treat the store like it was just another HausWitch project and that idea is what kept me from curling up into an overwhelmed tiny ball of a person. As long as this was just another HausWitch project then it wasn’t a huge, scary thing. It was a thing I already knew how to do. So here’s a quick before and after:

 The store’s location really chose me. I was thinking of maybe dipping my toes in the water of possibly opening a store. On March 11th I told a commercial real estate agent that “I didn’t want to waste her time, but could I maybe see the property at 144 Washington St. in Salem?” Within about 30 seconds of walking in to the space for the first time I knew I was opening a store, and I was opening it there. The location is right in the center of downtown Salem. The ceilings are 12ft high. THAT BRICK. THOSE WINDOWS. C’mon! The conversation went a little like this:
Me: So what do I do now?
Agent: Well, you should apply for a lease.
Me: But I have no idea what I’m doing.
Agent: Nobody does.
So I talked to some very smart, money and magic minded folks, got the green light, and applied. On April 28th I signed the lease.
The great thing about this space was that it would require so so so little to make it shine as an interiors-based business. I knew that all I needed to do was paint the walls, separate a little bit of the back for a HausCraft workshop, and try to do the existing features justice. So, first step was paint!
I knew I wanted it all white, because I always want everything all white. Its just the simplest way to make a space bright, fresh and open. I used “Four Winds” by Valspar because it was a nice warm white, with a nice witchy name. After a brief delusion about Dave and I painting the place ourselves I ended up hiring professionals. I was trying to be budget conscious and DIY and in all honesty, I felt bad about having to make that call. But in the end, the space came out beautiful. All told, the paint and labor came to about $1000.00

Next up was shelving and fixtures. My carpenter-witch Pat Harper’s name popped into my head almost immediately as this idea first started taking shape. I knew he would do an amazing job with whatever I wanted to do, and I could trust him. That was all I needed. I knew I would use the recessed wall on the right side of the store for the shelves because I love the look of minimal, floating wood shelving set into a wall. I showed him some ideas of what I was going for- but it wasn’t til the last minute that I came up with the idea of creating a “peak” shelf so that it looked like the roof of a house.
So, we planned and budgeted. I had to compromise having actual “floating” shelves because invisible brackets were just waaay too expensive. I wanted them to be thick so Pat layered 2 sheets of birch plywood together and added a facade to the front so you couldn’t see the layers. Each shelf is 10ft. long, 15″ deep and 1.5″ thick. We used “Honey” stain by miniwax and two coats of polyurethane.

Two days, 5 pizzas, and countless hours of watching Pat Harper be super impressive, and VIOLA!

The HausStore had HausShelves! Again, labor + supplies came to $1000. Of course I got a pretty sweet deal on labor. 😉
Since I was decorating the store like an apartment with furniture that would also be for sale, I didn’t need a ton of fixtures. Craigslist and IKEA would help me with the few key pieces I needed to make it a store. Pat and I made the desk/checkout counter the same way we did the desk in my studio at home. This time I used the adjustable FINNVARD legs, and 7 ft piece of birch plywood for the top. I used the same stain/poly combo as on the shelves.

For hiding supplies I found the IKEA PS storage locker in the “As Is” section for 40% off. A small filing cabinet, desk chair and white bookcase, all from Craigslist, finished off the “behind the desk” set up.

The wall hanging is from Ramble Market and it is a thing of wonder and beauty. It is for sale, but it will cost ya.
I bought the omnipresent KALLAX unit for the HausCraft display/workspace partition. Party in the front:

manual labor in the back:
Don’t worry- she loves it.
I bought one last shelving unit from Craigslist and I was all set.

Total spent on fixtures:
Kallax: $200
Desk Legs: $80/pair
Credenza: $60
File Cabinet: $30
Bookcase: $10
Desk Chair: $50
Shelving Unit: $70
Total: $500.
And just like that I had a store. All I had to do was fill it with stuff! All told it cost about $2500 to take the space itself from empty ex-bike shop to HausWitch Home + Healing.

 You can see a bunch more “After” pics at the store’s new website, www.hauswitchstore.com.
I still can’t believe that all of this happened, and that this is my job now. I pinch myself everyday.
The moon is in Libra and the witches say, “Be tasteful in your witchcraft.”

it’s so cute!!
How did you go about getting such a variety of products in your store? Did you directly contact companies/designers/artists? How is business going? Busy, I hope!!
It looks fantastic!